Beach Refuge: recycled containers with ocean views

Beach Refuge: recycled containers with ocean views
By Bevin Chu
April 6, 2013
Taipei, China

Beach Refuge: recycled containers with ocean views
http://www.busyboo.com/2013/03/17/container-beach-hut/
Casa Huente
http://www.pabloerrazuriz.cl/2013/03/casa-huente/

Standard 20 and 40 foot long ISO shipping containers have been often used as emergency housing in disaster areas.


Standard ISO Shipping Container

Unfortunately those charged with using shipping containers for this purpose, even in the “First World,” are usually tone deaf and color blind when it comes to design. The results can be dismal indeed.


Typical Poorly Designed Emergency Housing:
How NOT to design a Shipping Container House!

My own preliminary study of shipping container housing design has taught me that three design features are essential for shipping container houses:

1. The shipping container house must be elevated above the surrounding grade level, at knee height or above
2. The shipping container house must include a generous elevated outdoor deck, that is both visible and accessible from within the house 
3. The outdoor deck must be covered by a roof or a canopy

The shipping container beach refuge shown below, by contrast, was designed by talented Chilean architect Pablo Errazuriz. It has all essential three design features mentioned above, and meticulous attention to architectural design. The result is impressive. It and other architect designed shipping container homes, suggest the unrealized potential in shipping container architecture.   

Site Plan/Floor Plan


Aerial View, Inland Side


Elevation, Inland Side


Deck, Inland Side


Ramp, Inland Side


Ramp, Inland Side


Elevation, Ocean Side


Deck, Ocean Side


Ocean View, Interior


Mies van der Rohe’s Farnsworth House, with similar design parti: a rectangular box shaped house on elevated stilts, with covered outdoor deck. I would not be the least bit surprised if Pablo Errazuriz’s beach refuge was inspired by the Farnsworth House.

7-11 vs. Starbucks

7-11 vs. Starbucks
by Bevin Chu
Taipei, China
October 18, 2012


Starbucks Taiwan “Phinney” Stainless Steel Tumbler – 900 NT
(Sold for $19.95 in the US)
Available in white


7-11 Taiwan “City Cafe” Stainless Steel Tumbler – 399 NT
(354 NT if you deduct the 45 NT Medium Latte included free with each purchase)
Available in Trendy Silver or Simple White

Notice how the tumblers are nearly identical? They were almost certainly supplied by the same OEM manufacturer on mainland China. 

If you deduct the price of the medium latte that comes free with the tumbler, the cost is only 354 NT. That means a savings of 546 NT over a nearly identical tumbler from Starbucks.

I bought one each of the 7-11 City Cafe tumblers. One in “Trendy Silver,” or brushed stainless steel, and the other in “Simple White,” or white enamel. They’re very well made. The tolerances are close. The detailing is precise. The slight taper keeps the tumbler from slipping in case one’s hand is wet or oily. Most importantly, the lip has a large radius curve where one’s mouth touches the tumbler.


Note the rounded lip on this Starbucks tumbler? Click on the photo. The 7-11 tumbler has the same rounded lip. That is how it should be.


Many tumblers/vacuum bottles on the Taiwan market have an almost raw sheet metal edge at the lip. Click on the photo. This is not how it should be. Frankly I don’t understand how anyone could have signed off on such a design and allowed it to go into production.

DIY Steel Car Rim Barbecue Grill

DIY Steel Car Rim Barbecue Grill
by Bevin Chu
October 1, 2012
Taipei, China

Back in the late 80s I had the idea of turning an ordinary salvaged steel car rim into a portable barbecue grill.

My idea was to take a steel car rim:

Bolt it onto a standard four pronged restaurant table base:

Then add a wire cooking grate:

This would result in a convenient waist height barbeque grill that did not require stooping.

The parts shown in the photos are new. I would of course use recycled parts wherever possible and appropriate.

Because I was constantly moving from one city to another, I never got around to actually doing it. Lo and behold however, the same idea occurred to others, who did follow through, who confirmed that it was indeed an excellent idea.

Here are two outstanding examples. The first is supported by four short chrome plated steel Ikea cabinet legs from below. The second is supported by two long galvanized steel chains from above. 


Rolling BBQ! How to make a BBQ out of an old Wheel 
http://diyrobj98168.blogspot.tw/2009/08/rolling-bbq-how-to-make-bbq-out-of-old.html


hanging barbecue grill
http://gageslaughter.wordpress.com/tag/hanging-barbecue-grill/

Incidentally, I see no reason why one couldn’t make one out of an old mag wheel either.

Alternative: A DIY Galvanized Steel Water Bucket Barbecue Grill 

An even cheaper, more expedient, more portable alternative, might be this barbecue grill made from a galvanized steel water bucket. Buckets such as these are available brand new for only 10 USD. This one looks like it was designed to burn wadded up sheets of newspaper, like the old “Qwik Cook Grill” Dick Butkus endorsed in TV informercials 20 years ago. But it could easily be redesigned to burn charcoal. Just add a charcoal grate below the cooking grate.  


BBQ grill from a bucket
http://pinterest.com/pin/151855818656125055/


San Diego Chargers Tailgating’s Favorite Grill, the Qwik-Cook.
http://www.sdchargerstailgating.com/tag/qwik-cook-grill

How to Convert ODT Files into JPG Files Using GIMP


LibreOffice: Writer, Calc, Impress, Draw, Math and Base
http://www.libreoffice.org/


GIMP: GNU Image Manipulation Program
http://www.gimp.org/

How to Convert ODT Files into JPG Files Using GIMP
Bevin Chu
September 17, 2011
Taipei, China

Did you know you can convert your LibreOffice/OpenOffice Open Document Text (ODT) files (or MicroSoft Word DOC files) into GIF, JPG, PNG, or TIF files, using GIMP?

Say you have an ODT (or DOC) file that you want to convert to an image file, such as a JPG (or GIF, PNG, TIF) file. Say you want to display it on one of your webpages as a visible image, rather than as a downloadable file.

All it takes is two easy steps.

Step 1: Using LibreOffice/OpenOffice Writer, open your ODT file. Export the ODT file as a PDF file using the “Export as PDF” command under “File.”

Step 2: Using GIMP, open the just created PDF file. Save the PDF file as a JPG file using the “Save As” command under “File.”

That’s it. You’re done!

You now have a JPG file that will immediately be visible on your webpage upon uploading.

No need to throw away good money for commercial conversion software. No need to risk security leaks by uploading sensitive information to an online conversion utility. Instead, make use of open source software, such as LibreOffice/OpenOffice and GIMP.

Something this elementary ought to be easy to find. But oddly enough it wasn’t. I drilled down pretty deep before finally stumbling across this information.

“GIMP, the GNU image manipulation program, is basically the open source version of Adobe Photoshop. These two programs are frequently compared to each other due to their similarities. However, GIMP was not designed to be a Photoshop clone. Adobe Photoshop retails for around $450. Gimp is FREE. This is a very robust image editing program that allows even the beginner to do some pretty amazing tricks.”

— Bright Hub Review

A Note to MicroSoft Word Users: I use LibreOffice because it is Open Source Software. From what I have read online, the process is similar for MS Word.

How to Convert ODT Files into JPG Files Without Additional Software


LibreOffice: Writer, Calc, Impress, Draw, Math and Base
http://www.libreoffice.org/

How to Convert ODT Files into JPG Files Without Additional Software
Bevin Chu
September 17, 2011
Taipei, China

Did you know you can convert your LibreOffice/OpenOffice Open Document Text (ODT) files (or MicroSoft Word DOC files) into GIF, JPG, PNG, or TIF files, using only the software already on your PC?

That’s right. No need to download and install specialized software useful for no other purpose.

Say you have an ODT (or DOC) file that you want to convert to an image file, such as a JPG (or GIF, PNG, TIF) file. Say you want to display it on one of your webpages as a visible image, rather than as a downloadable file.

All it takes is two easy steps.

Step 1: Using LibreOffice/OpenOffice Writer, open your ODT file. Export the ODT file as a PDF file using the “Export as PDF” command under “File.”

Step 2: Using LibreOffice/OpenOffice Draw, open the just created PDF file. Export the PDF file as a JPG file using the “Export” (not “Export as PDF”) command under “File.”

That’s it. You’re done!

You now have a JPG file that will immediately be visible on your webpage upon uploading.

No need to throw away good money for commercial conversion software. No need to risk security leaks by uploading sensitive information to an online conversion utility. No need to even download additional freeware.

Something this elementary ought to be easy to find. But oddly enough unless you happen to search for it under “videos,” it isn’t. For the record I drilled down pretty deep before finally coming across this information at YouTube, of all places.

In the event LibreOffice/OpenOffice Draw has trouble reading your PDF file, use GIMP to convert your PDF file to a JPG file. See my blog entry: “How to Convert ODT Files into JPG Files Using GIMP.”

A Note to MicroSoft Word Users: I use LibreOffice because it is Open Source Software. Based on what I have read online, the process is similar for MS Word DOC files.

Giant CT 102 to Front Wheel Drive Low Rider Conversion

Giant CT 102 to Front Wheel Drive Low Rider Conversion
by Bevin Chu
Taipei, China
March 19, 2011

Giant CT 102 Urban Commuter Bike

In previous posts I spoke of converting my Giant CT 102 Urban Commuter Bike into a DIY LWB Mid Racer, Low Racer, or FWD Delta Trike.

An alternative might be the following DIY FWD Low Rider Conversions by Robert Horn, of Englewood, Colorado, USA.

Robert Horn’s Super Chopper
http://www.ratrodbikes.com/forum/viewtopic.php?f=1&t=22701&st=0&sk=t&sd=a&start=0

Very few DIY bike designs are as ingenious as these F’Lowroller variants. They are remarkable for their economy of design, and deserve greater recognition and exposure than they have gotten.

They are clearly superior to many better known DIY bike designs that call for the fabrication of many components from scratch. They require only one donor bike, not two or even more. They ingeniously move the bottom bracket / chainstays / rear wheel to the front, and the front fork / front wheel to the rear. The original handlebars can be reused as well. Waste not, want not.

They are more aesthetically pleasing than many DIY bike designs, which often look very “ghetto.” The F’Lowroller variants look futuristic and elegant — almost like factory prototypes debuted at an industrial design expo by some big name bike manufacturer.

Robert Horn’s New F’Lowroller
http://bikerodnkustom3.homestead.com/gallery291.html

Robert Horn’s F’Lowroller
http://bikerodnkustom3.homestead.com/gallery167.html

See: ROHORN Mind Expanding Cycles
http://www.rohorn.com/

Giant CT 102 to Front Wheel Drive Delta Trike Conversion

Giant CT 102 to Front Wheel Drive Delta Trike Conversion
by Bevin Chu
Taipei, China
March 18, 2011

Giant CT 102 Urban Commuter Bike

In previous posts I spoke of converting my Giant CT 102 Urban Commuter Bike into either a DIY LWB (Long Wheelbase) Mid Racer or Low Racer

An alternative might be the following DIY Front Wheel Drive Delta Trikes.

These trikes are exceptionally easy to construct. Their front drive / rear steering configuration is simplicity itself. It obviates the need for either the complex steering geometry normally found on the front wheels of tadpole trikes, or the custom made hubs normally found on the rear wheels of Rear Wheel Drive Delta Trikes.

Homebuilt Recumbent Trike, by Charlie Little of Mansfield, Arkansas, USA
http://www.manytracks.com/Recumbent/clittle.htm

Front Wheel Drive Delta Trike, by Bill “Yoda” Irvine of Phoenix, Arizona, USA
http://www.recumbents.com/wisil/misc/eliasohn/bill_irvine.htm

Front wheel drive and three speeds, rear wheel steering, owner uses it to commute five to six miles daily

Minnesota HPVA FWD Ice Racers
http://members.bitstream.net/~dkrafft/icebike/icerace.html

These ingenious ice trikes simply flip the rear triangle of a DF bike upside down. Presto! Instant FWD assembly for delta ice trike. Equally applicable to delta street trike, such as the ones shown above.

Lean Steer Recumbent Trikes, by Robert Horn of Englewood, Colorado, USA
http://www.rohorn.com/

These are not quite as easy to build. Therefore I would probably not attempt to build them. But they are beautiful looking trikes well worth studying for their ingenious lean steer design.


2003 Version


2007 Version

Giant CT 102 to LWB Low Racer Conversion

Giant CT 102 to LWB Low Racer Conversion
by Bevin Chu
Taipei, China
March 17, 2011

Giant CT 102 Urban Commuter Bike

In a previous post I spoke of converting my Giant CT 102 Urban Commuter Bike into a DIY LWB (Long Wheelbase) Mid Racer.

An alternative might be the following DIY LWB Low Racers.

These LWB low racers are constructed with a single length of straight tubing. A number of builders have used 1.5″ x 1.5″ x 0.125″ (3.8cm x 3.8cm x 0.3cm) square steel tubing. This single section of mild steel tubing connects the bottom bracket to the rear triangle, and forms the main chassis of the bike. Relatively little fabrication and welding is required.

On a LWB Low Racer the cyclist is seated very low to the ground, almost as low as on a tadpole trike. The low seating height minimizes injuries in the event of a spill.

Leo’s Big Low Rider
http://www.manytracks.com/Recumbent/leonardi.htm#bikes

Homba’s Long Wheelbase Low Racer Recumbent Bicycle
http://www.instructables.com/id/Build-a-long-wheelbase-low-racer-recumbent-bicycle/
http://www.youtube.com/watch?v=jVqNFPh32w4&feature=player_embedded
http://homsher.com/bike/mantis/img/

Head tube

Head tube

Remote head tube with steering linkage

Remote head tube with steering linkage

View from Cockpit

1.5″ x 1.5″ x 0.125″ square steel main chassis tube, welded to bottom bracket

Seat Back Support

Underside of seat and chain idler

Bolted connection between chainstays and main chassis

Giant CT 102 to LWB Mid Racer Conversion

Giant CT 102 to LWB Mid Racer Conversion
by Bevin Chu
Taipei, China
February 20, 2011

Giant CT 102 Urban Commuter Bike

Three years ago I bought a Giant CT 102 Urban Commuter Bike. Now that I am forsaking upright bikes for recumbent bikes, I am seriously considering converting it to a DIY LWB (Long Wheelbase) Mid Racer.

Doing so would put the seat height dramatically lower than it is now, making the bike far safer in the event of a spill.

If I do go ahead, I will convert it to something similar to the following DIY LWB Mid Racers.

Recumbent Share Archive
http://www.manytracks.com/Recumbent/RecumbentShare.htm
Recycled Recumbents
http://sites.google.com/site/recycledrecumbents/home
Atomic Zombies Extreme Machines
http://www.atomiczombie.com/gallery/lwbbents1.html
http://www.youtube.com/watch?v=GobWsort58A&feature=related


Bill Meacham’s Aluminum Recumbent, Scottsdale, Arizona, USA


Louis’s Homebuilt Recumbent, Toronto, Ontario, Canada


Brian Bolton’s Yellow LWB, Canada


Rob Szymanski’s Recycle, USA


Steve’s Tourmaster, USA


Joey Wallace’s Black Widow, USA


Larry’s Yellow Bent, Canada


Dan Peterson’s Green Machine, USA

The above DIY LWB Mid Racer Recumbents are variations on the DIY Atomic Zombie TourMaster, shown below.

Atomic Zombie DIY TourMaster LWB Mid Racer, Three Views

The Atomic Zombie TourMaster is a variation on the Easy Racers Gold Rush of 1986, which won the DuPont Prize and set a world speed record as the first bicycle to exceed 65 mph.

Easy Racers Gold Rush LWB Mid Racer

The Easy Racers Gold Rush in turn, is a variation on the Jarvis Bicycle of 1902.

Jarvis Bicycle of 1902, possibly the first LWB Mid Racer Recumbent

As the saying goes, “There is nothing new under the sun.”

Performer Low Racer COMP Limited Edition

Performer Low Racer COMP Limited Edition
by Bevin Chu
Taipei, China
February 19, 2011

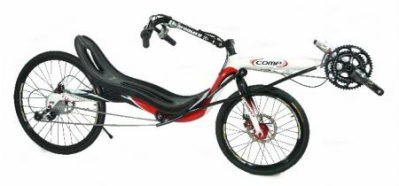
Performer has just introduced a new model, the Performer Low Racer COMP Limited Edition
http://www.performer.com.tw/2010/user/product_2.php?wp=05&sno=00377

The company website provides three photos of the bike, but no data.

The photos indicate that it has disc brakes instead of calipers, and a different wheelset than the Low Racer Caliper. The front tire in particular, appears much wider than the 20×1 tire on the Low Racer Caliper.

Update as of March 10, 2011, by company representative George:
Low Racer COMP Limited Edition
alloy frame with alloy fork (carbon fork not strong enough for disc brakes) / SRAM Attack shifter / Shimano XT rear derailleur / Truvativ Elita 52/39/30 crank 170 mm integrated / 11-34 cogset / sealed bearing wheelset / Avid BB5 disc brakes / Kenda K193 20×1.25 (32-406) 100 psi front / Kenda K193 26×1.25 (32-559) 100 psi rear / 1060 gm FRP seat standard / 620 gm CF seat optional 6000 NT
MSRP 42,500 NTD

It also has a slick red, white, and black color scheme, strikingly similar to that on the Giant Rapid 3 Sport Bike, rather than the monochrome color scheme of the Low Racer Caliper.

Giant Rapid 3 Sport Bike Color Scheme